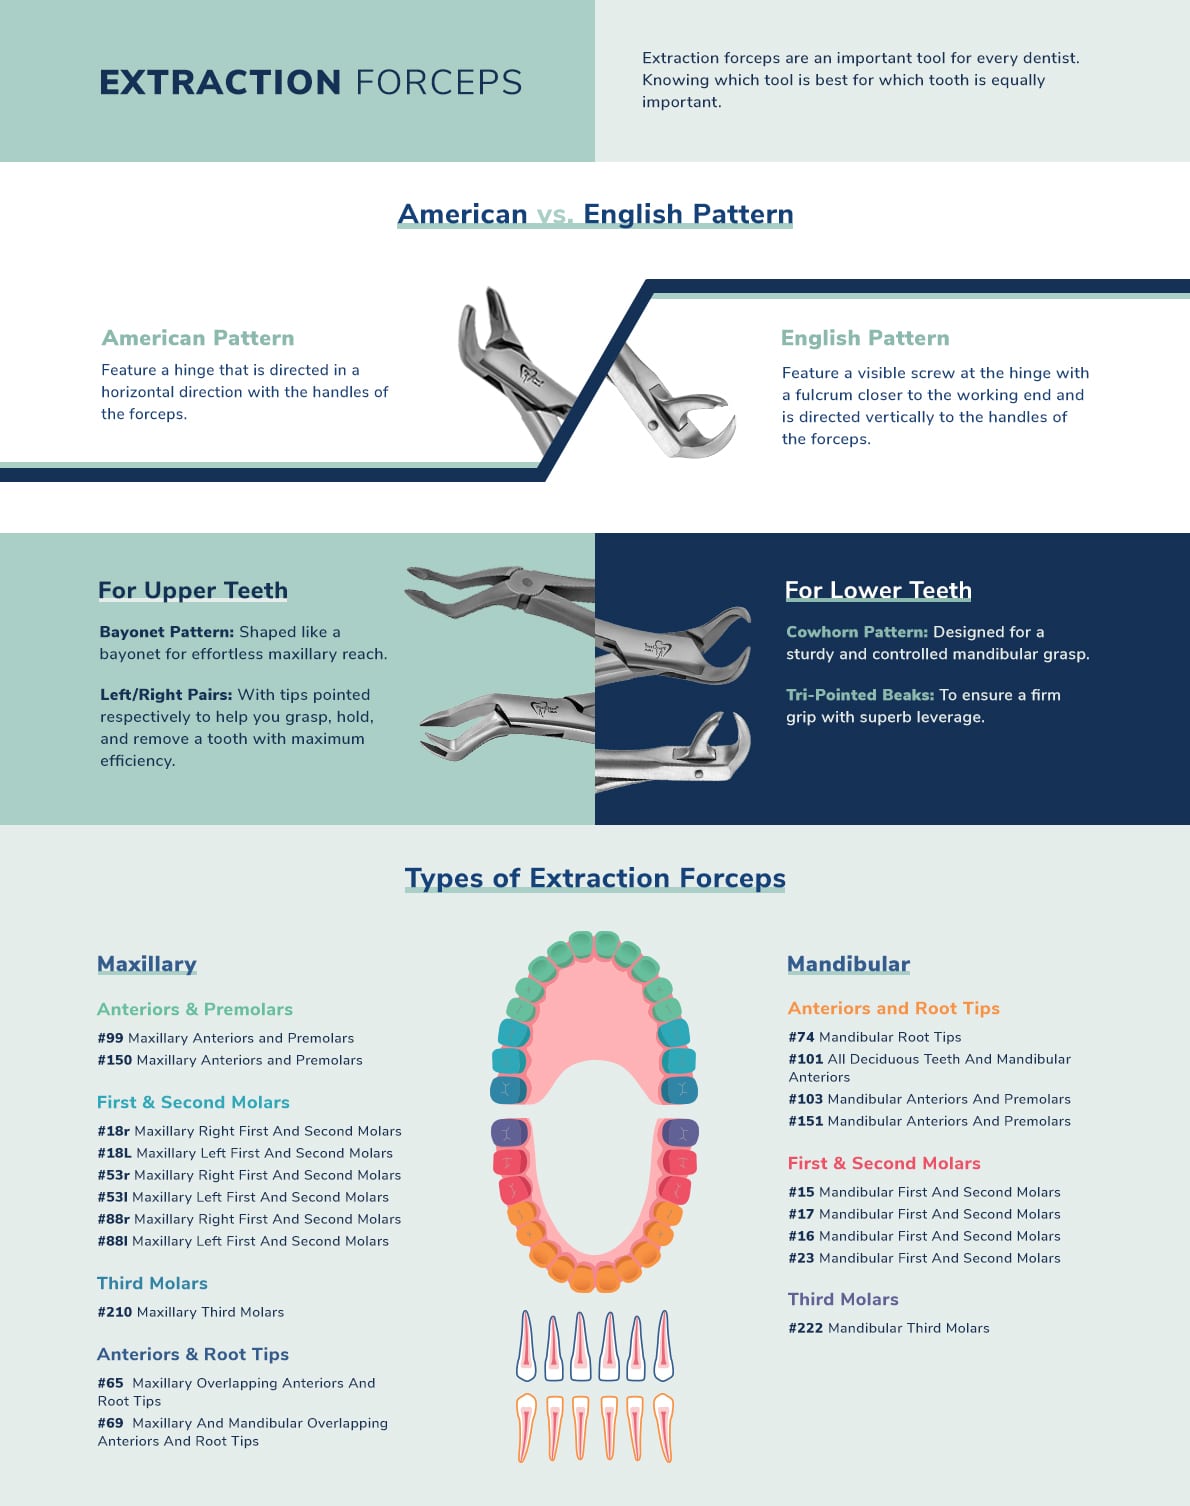
Extraction forceps are among the most valuable tools a dentist has at their disposal, but knowing which tool is best for which tooth is just as essential. This dental forceps overview looks at the different types of extraction tools so you can select the right one for each tooth.
Types of Extraction Forceps And Their Uses
There are many types of dental forceps since each pair of extraction forceps is specific to a particular tooth or set of teeth. The ideal solution will depend on the tooth’s location and age. We’ll start with the best choices for maxillary extractions.
Maxillary
The maxillary forceps mirror the upward and outward curvature of the upper jaw. These tools have straight or slightly curved handles with beaks contoured to grip teeth securely along their long axis.
Common maxillary forceps include:
Anterior and premolar: For anteriors and premolars, forceps like #99 and #150 are the ideal choices. The #99 forceps have a straight handle and beaks that conform to facial and lingual root contours. They’re also universal, working for right and left quadrants. The #150 forceps offer similar benefits, using contoured beaks apical to the cervical line.
Molar: The #18L, #18R, #53L, #53R, #88L and #88R are examples of the best choices for maxillary first and second molars. Each has L or R markings designating the left and right quadrant, and each beak has a different design to adapt to the maxillary molar roots as needed.
Third molar: Models with a universal bayonet design, like the #210, work equally well for both quadrants.
Root and root tips: For anteriors and root tips, clinicians can use forceps like the #65 and #69. The #65 has a universal bayonet design to make it easier to access hard-to-reach teeth, tooth fragments and root tips for maxillary overlapping anteriors. #69 forceps do the same for both maxillary and mandibular overlapping anteriors and root tips.
Mandibular
Mandibular forceps have a sharp angle with straight or downward-bent handles to account for vertical extraction trajectories.
Common mandibular forceps include:
Anterior and root tips: For mandibular anteriors and root tips, professionals can use universal beak designs like the #74 forceps. Other examples like the #101 forceps are for all deciduous teeth and mandibular anteriors, while the #103 and #151 are necessary for mandibular anteriors and premolars. The #101 and #151 use a universal bird beak design, while the #103 has both straight handles and beaks.
Molar: For mandibular first and second molars, clinicians can use forceps such as #15, #17, #16 and #23. The #15 and #17 forceps are essentially the same tool, with #15 having curved handles and #17 having straight ones. The #16 and #23 forceps both use a universal cowhorn beak design.
Third Molar: For mandibular third molars, forceps like the #222 are the best choice. The universal bayonet design easily conforms to facial and lingual root contour.
American vs. English Pattern Forceps
There are two commonly available design patterns in extraction forceps — American and English.
American Pattern Forceps
American pattern forceps use a horizontal hinge. The straight-handled design feels natural in the hand and gives a clear line of sight for most extractions.
Key features include:
Serrated jaws.
Wide handle.
Various sizes and styles.
Blunt tips.
Ergonomic design.
American pattern forceps are advantageous because there’s a broad selection of models for nearly every tooth type. The balanced weight and grip design offers comfort for long procedures.
However, they may require more hand strength during posterior extractions. These forceps may not be ideal for cases with reduced access or limited mouth opening.
English Pattern Forceps
English extraction forceps use a visible screw at the hinge that brings the fulcrum closer to the tool’s working end. They allow for greater leverage than American pattern forceps.
Key features include:
Vertical hinge.
Plier-like handle design.
Serrated beak.
Texture handles.
English pattern forceps require less wrist motion, helping reduce fatigue. Their compact design enables a strong grip force, and the instrument is useful in cases with restricted access or limited elevation options.
However, these forceps may involve a learning curve for clinicians trained primarily on American forceps.
Forceps for Upper Teeth Extractions
When working with the upper teeth, two types of extraction forceps provide the best angle and grip.
Bayonet-pattern forceps resemble a bayonet, providing the best maxillary reach possible. They’re primarily for removing teeth from bony sockets, with rounded beaks that contour to lingual roots.
Left/right pairs use pointed tips to grasp, hold and remove teeth with maximum efficiency. They have angles to accommodate the unique challenges of different sides of the mouth and come in location-specific designs for extracting anterior, root or molar.
Forceps for Lower Teeth Extractions
For lower teeth, there are also two options — cowhorn patterns and tri-pointed beaks. Lower cowhorn forceps are best for a sturdy and controlled mandibular grasp and get their name because when open, they resemble a pair of horns like you might find on a bull.
Tri-pointed beaks provide superior grip and leverage and, like the left/right pairs for the upper teeth, come in anterior, root and molar varieties.
Innovations in Dental Extraction Forceps
Modern extraction forceps support ergonomics, precision and patient satisfaction. With materials, grip comfort and efficiency advancements, clinicians can perform faster and safer.
Apply slow, apical pressure with forceps to seat the beaks securely.
Continue controlled rotational and buccal movement to disengage periodontal ligaments.
Canine teeth often have longer roots, requiring a modified approach:
Use upper or lower canine forceps.
Begin with flap reflection if needed.
Use slow rocking motions to prevent root tip fractures.
Apply apical pressure and use luxating elevators if access is limited.
Molars have multiple roots and require a specific extraction technique:
For upper molars, use forceps with split beaks. You can use a cowhorn for lower teeth with bifurcated roots.
Assess the root structure on X-ray first.
Reflect the gingiva to expose the tooth and surrounding tissue.
Start by applying pressure toward the root furcation to minimize crown breakage.
For cowhorns, place the beaks into the bifurcation and use a pump handle motion to elevate.
Best Practices for Safe and Effective Extractions
Before commencing any extraction, a comprehensive assessment is crucial to ensure patient safety and procedural success:
Test tooth mobility and review medical history, including bleeding disorders, medications, and previous dental procedures.
Conduct a thorough radiographic exam to visualize tooth structure, adjacent teeth and the surrounding bone.
Discuss the procedure and potential risks with the patient.
Pre-medicate if needed and ensure proper anesthesia delivery.
The extraction process requires careful execution to minimize trauma and promote optimal healing:
Prioritize minimally invasive techniques to preserve bone and reduce trauma.
Carefully prepare the mucoperiosteal flap for adequate access to the tooth and bone.
Use luxating elevators to gently raise the tooth from the bone. Ensure you preserve the socket.
Fit forceps to grasp the tooth and facilitate its removal.
Smooth and shape the socket to promote healing.
Proper post-operative instructions are essential for uneventful healing and patient comfort:
Instruct the patient to firmly bite on a gauze pad to control bleeding.
Prescribe appropriate pain medication to manage discomfort.
Prescribe antibiotics only when necessary.
Instruct the patient to avoid forceful rinsing for the first 24 hours to prevent dislodging the clot.
Advise patients to consume soft foods for the initial days after the extraction.
Encourage gentle brushing and flossing around the extraction sites after healing.
Extraction Forceps for Dental Students and Assistants
Getting hands-on with extraction tools is a crucial step in dental training. Below are the tools and care tips for gaining confidence.
Essential Tools for Learning and Practice
Key extraction-related instruments include:
Standard extraction forceps: These tooth extraction tools have simplified, ergonomic handles for better grip control to aid in the right pressure and wrist movements.
Periosteal elevators: Elevators are vital for loosening the gingiva gently before forceps application.
Hemostats: Hemostats assist in soft tissue management and control bleeding during extraction.
Mirrors and probes:Mirrors are essential for inspection and tactile feedback. They support the extraction workflow by improving visibility and assessment accuracy.
7 Tips for Instrument Handling and Care
Learning how to maintain your instruments is as important as mastering extraction techniques. Here are seven tips to extend tool lifespan, keep instruments safe and ensure clinical efficacy:
Wear gloves and protective gear: Always use gloves to protect yourself and maintain instrument sterility.
Organize your setup: Arrange tools logically for easy access to reduce handling errors and keep procedures smooth.
Inspect instruments before and after use: Check for functionality, dull beaks or loose joints.
Disinfect between patients: Immerse instruments in pH-neutral chemicals for 10 to 15 minutes to reduce contamination risk.
Follow proper sterilization protocols: Autoclaving is the gold standard. Ensure instruments are dry before storage to prevent corrosion.
Lubricate hinges and joints regularly: Smooth joint movement improves control and prevents wear.
Store instruments safely: Use trays and racks to avoid damage and contamination.
Frequently Asked Questions About Dental Extraction Forceps
Below are some common questions about dental extraction forceps.
How Do I Select the Right Forceps for Each Tooth?
To choose the correct forceps for a specific tooth extraction, consider the tooth’s location and root structure. The beaks should adapt to the contours of the crown and engage below the gumline without excessive pressure. For anterior teeth, look for precision tips with minimal bulk. For posterior teeth, choose designs that handle wider surfaces and provide leverage. The more precise the fit, the smoother and safer the extraction.
What Are the Common Mistakes to Avoid With Extraction Forceps?
Common mistakes to avoid with extraction forceps include:
Using the wrong forcep type.
Applying excessive force.
Neglecting pre-extraction loosening.
Ignoring maintenance.
Poor angulation.
Partner With ProDentUSA for High-Quality Dental Extraction Forceps
ProDentUSA designs extraction forceps to deliver precision, comfort and durability. Our instruments are made with surgical-grade recycled steel. Orders over $100 ship free across the U.S., and we offer flat-rate shipping on supply orders.
We stand behind our ProDent Promise. If something’s not right, we’ll offer replacements within the first year. Our customer service team offers pre- and post-sales support.
Contact us today to learn how we can help you continue spreading smiles, one instrument at a time.